What is a webhook?
A webhook is a mechanism that enables an application to receive automatic notifications or data updates by sending a request to a specified URL when a particular event or trigger occurs.
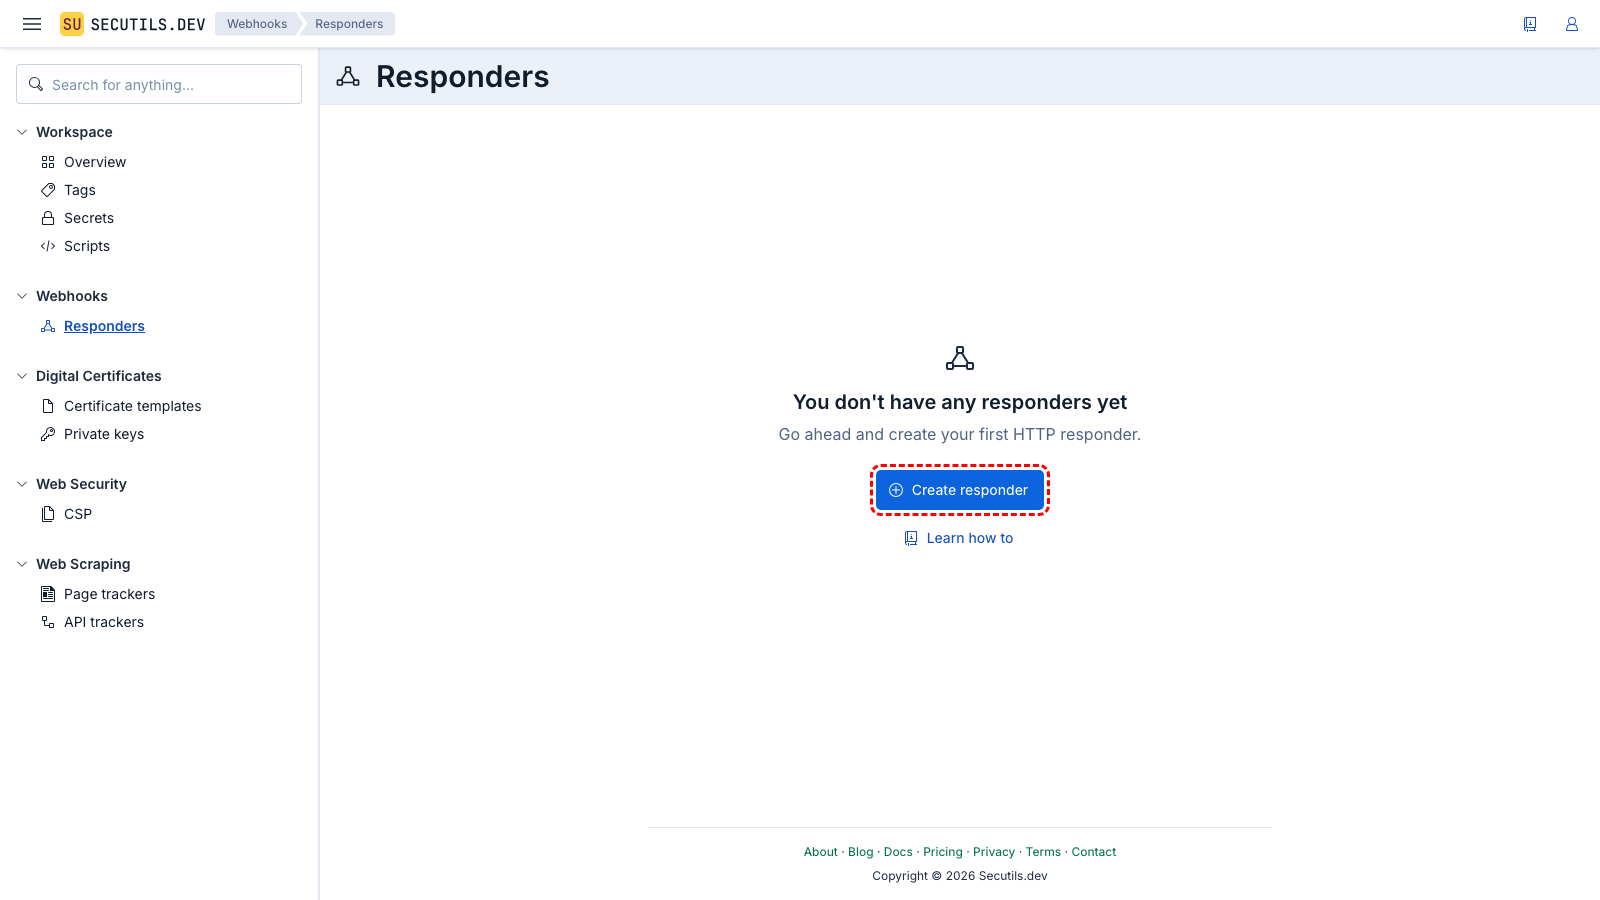
There are various types of webhooks that serve different purposes. One such type is the responder, which is a special webhook that responds to requests with a certain predefined response. A responder is a handy tool when you need to simulate an HTTP endpoint that's not yet implemented or even create a quick "honeypot" endpoint. Responders can also serve as a quick and easy way to test HTML, JavaScript, and CSS code.
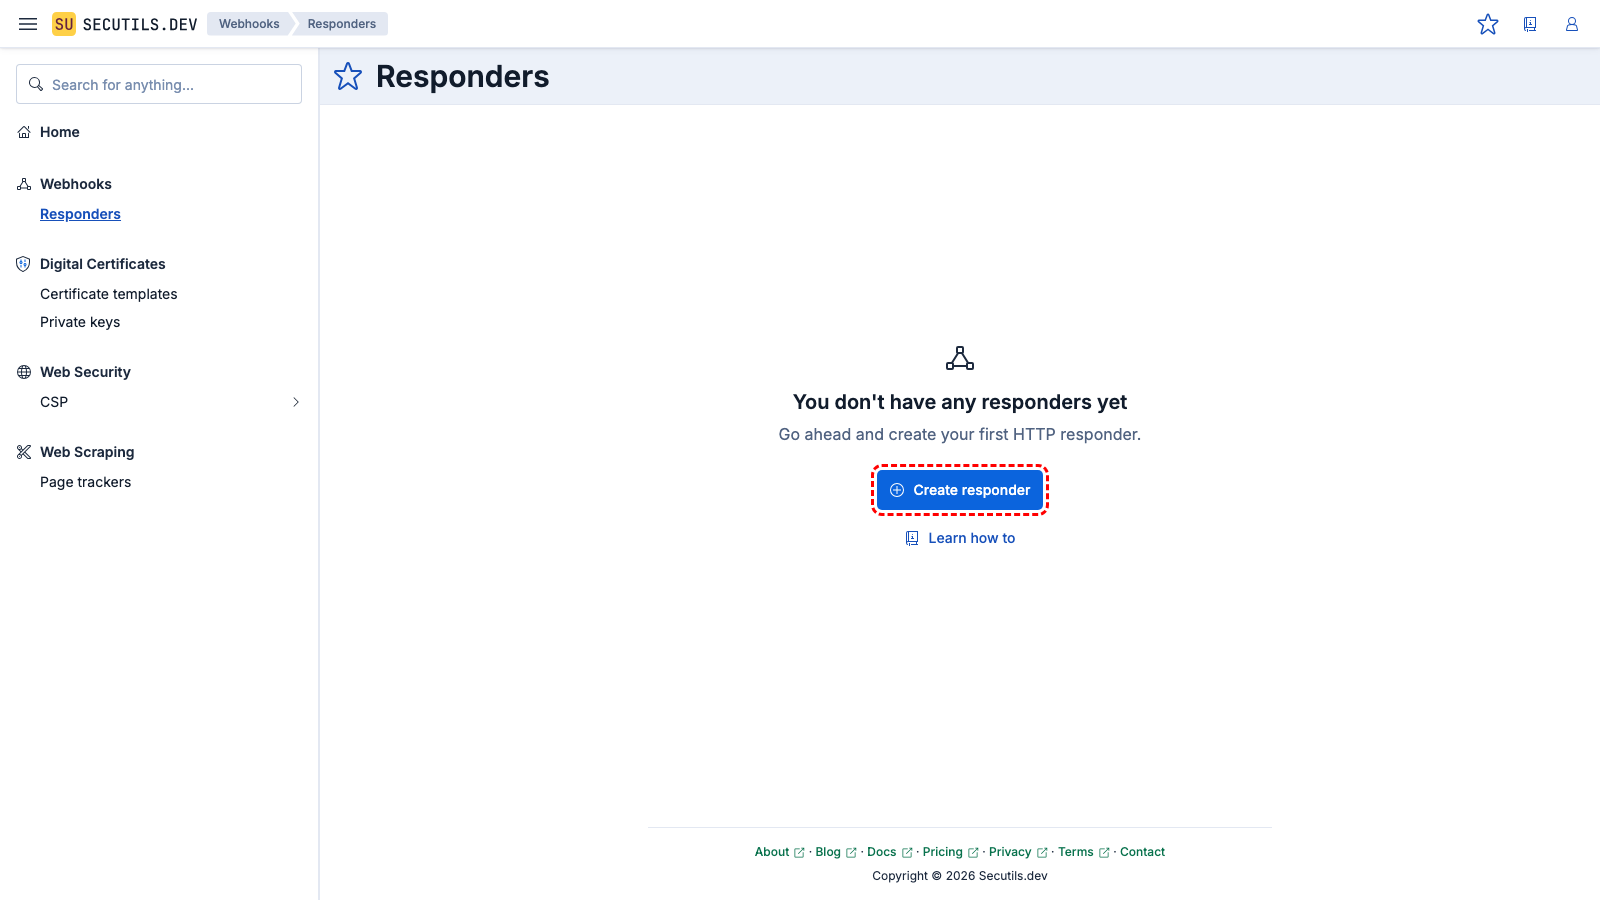
On this page, you can find several guides on how to create different types of responders.
Each user on secutils.dev is assigned a randomly generated dedicated subdomain. This subdomain can host user-specific responders at any path, including the root path. For instance, if your dedicated subdomain is abcdefg, creating a responder at /my-responder would make it accessible via https://abcdefg.webhooks.secutils.dev/my-responder.
Return a static HTML page
In this guide you'll create a simple responder that returns a static HTML page:

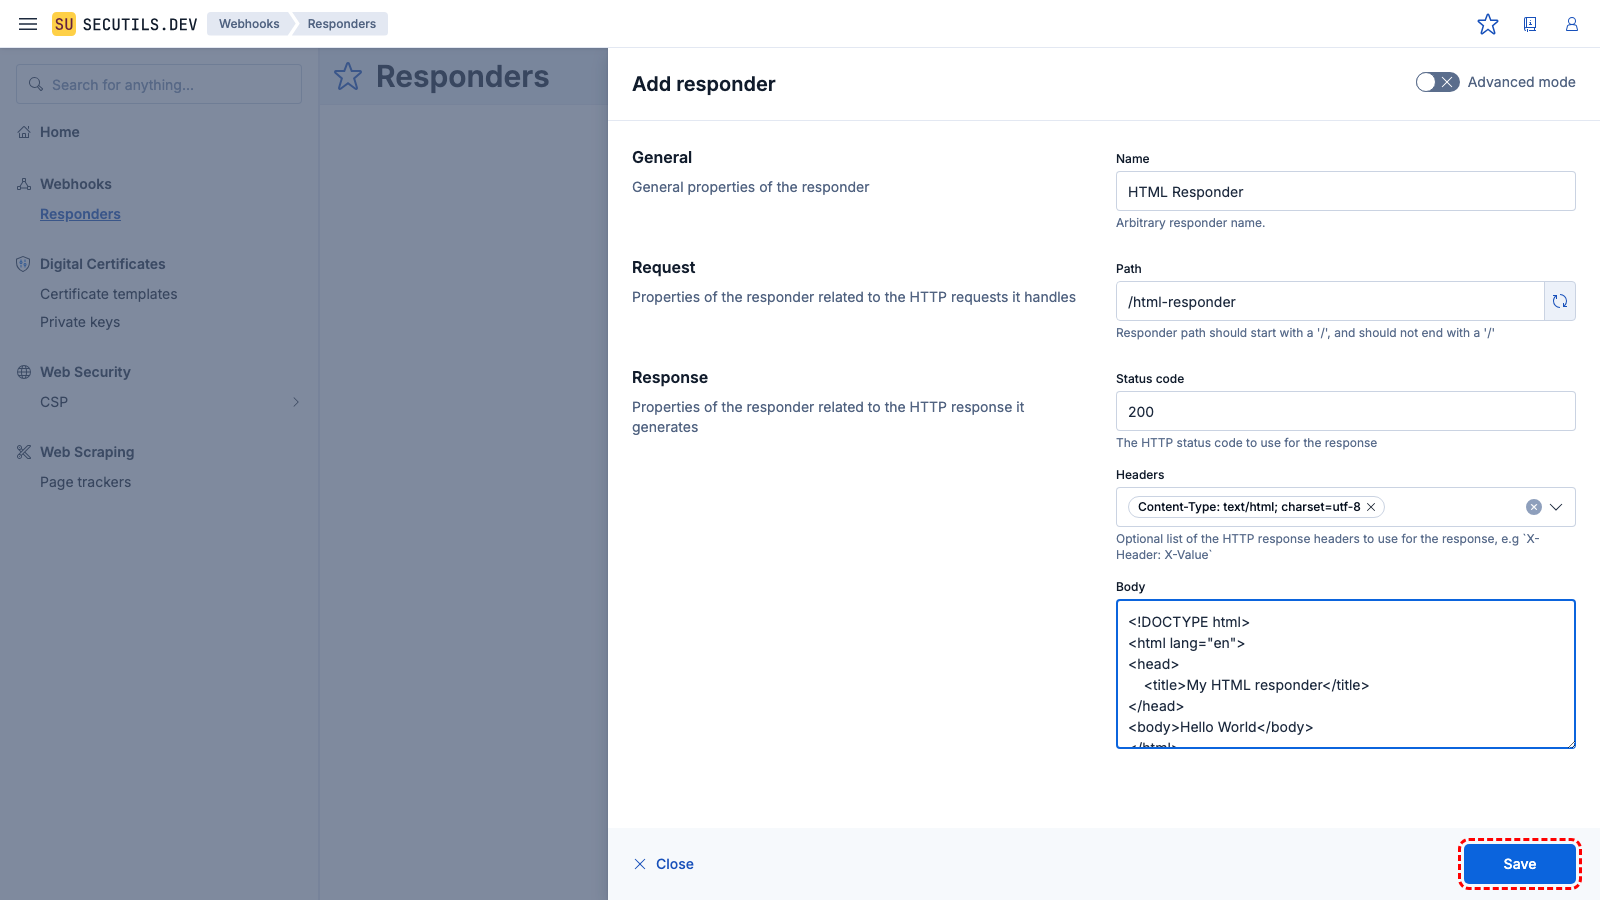
| Name | |
| Path | |
| Headers | |
| Body | |


Hello World.Emulate a JSON API endpoint
In this guide you'll create a simple responder that returns a JSON value:
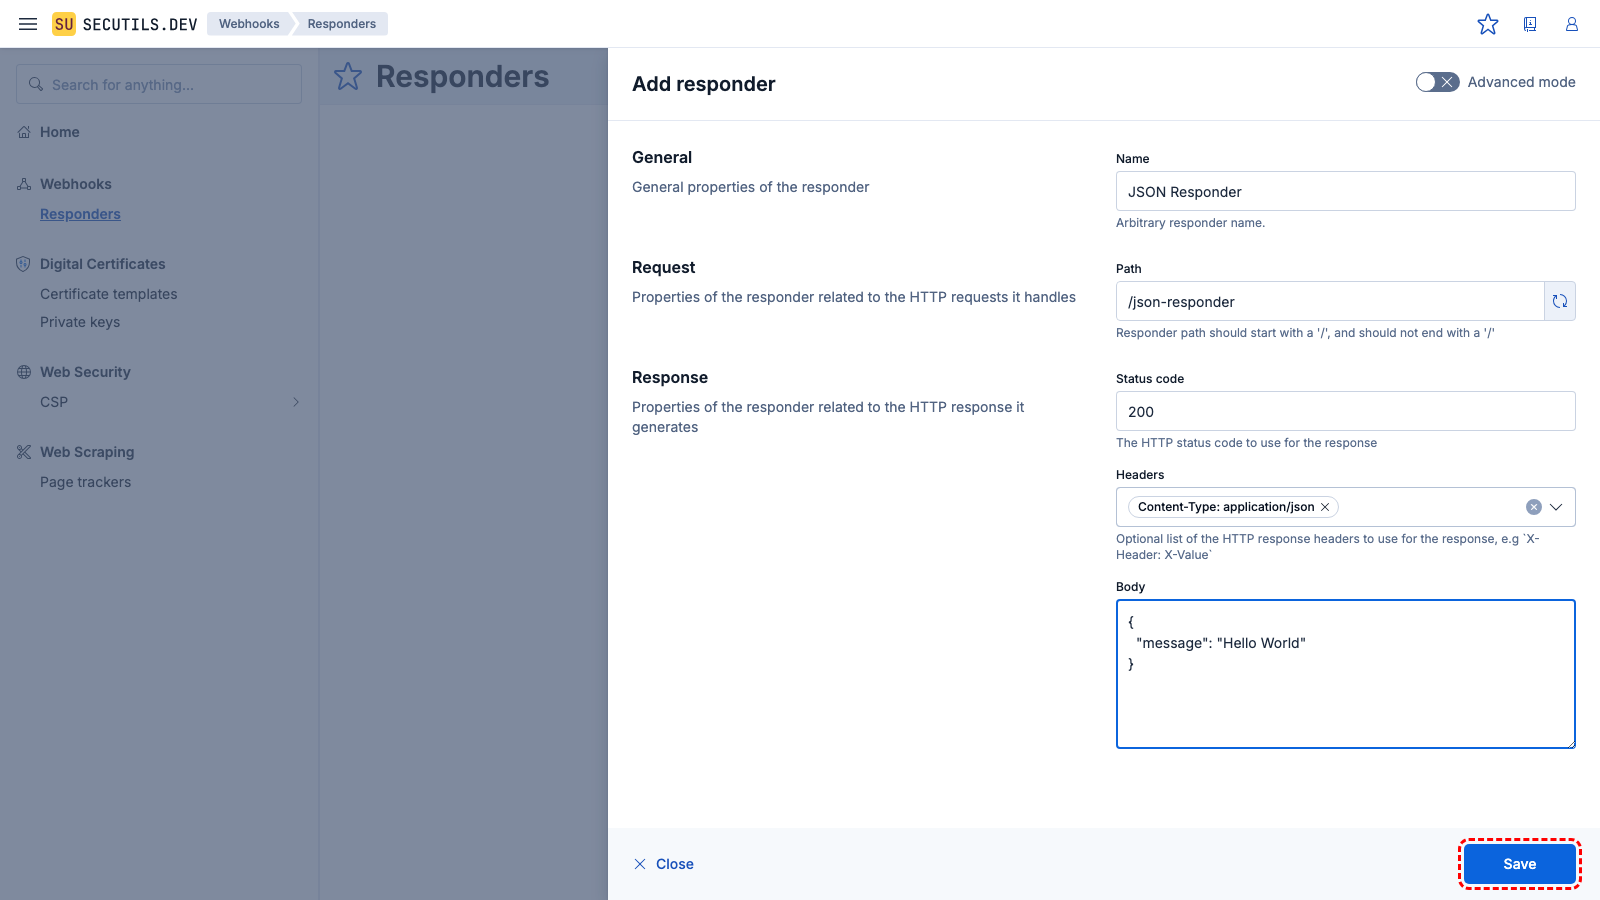
| Name | |
| Path | |
| Headers | |
| Body | |
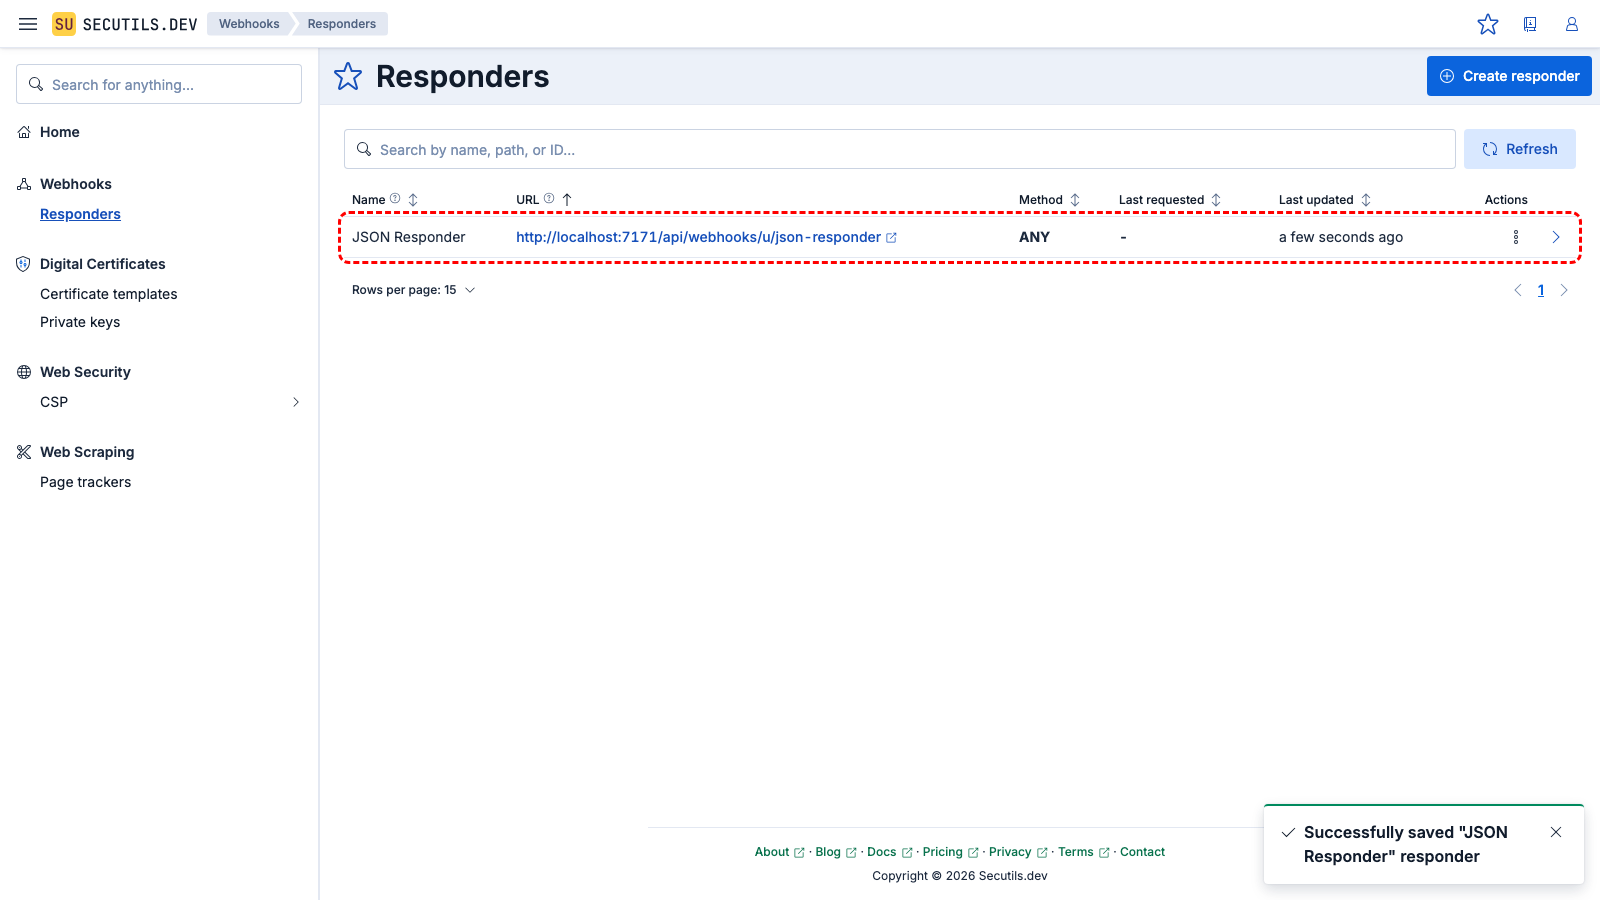
Use an HTTP client like cURL to verify the responder returns the expected JSON value:
$ curl -s https://<subdomain>.webhooks.secutils.dev/json-responder | jq .
{
  "message": "Hello World"
}
Use the honeypot endpoint to inspect incoming requests
In this guide, you'll create a responder that returns an HTML page with custom Iframely meta-tags, providing a rich preview in Notion. Additionally, the responder will track the five most recent incoming requests, allowing you to see exactly how Notion communicates with the responder's endpoint:
| Name | |
| Path | |
| Tracking | |
| Headers | |
| Body | |
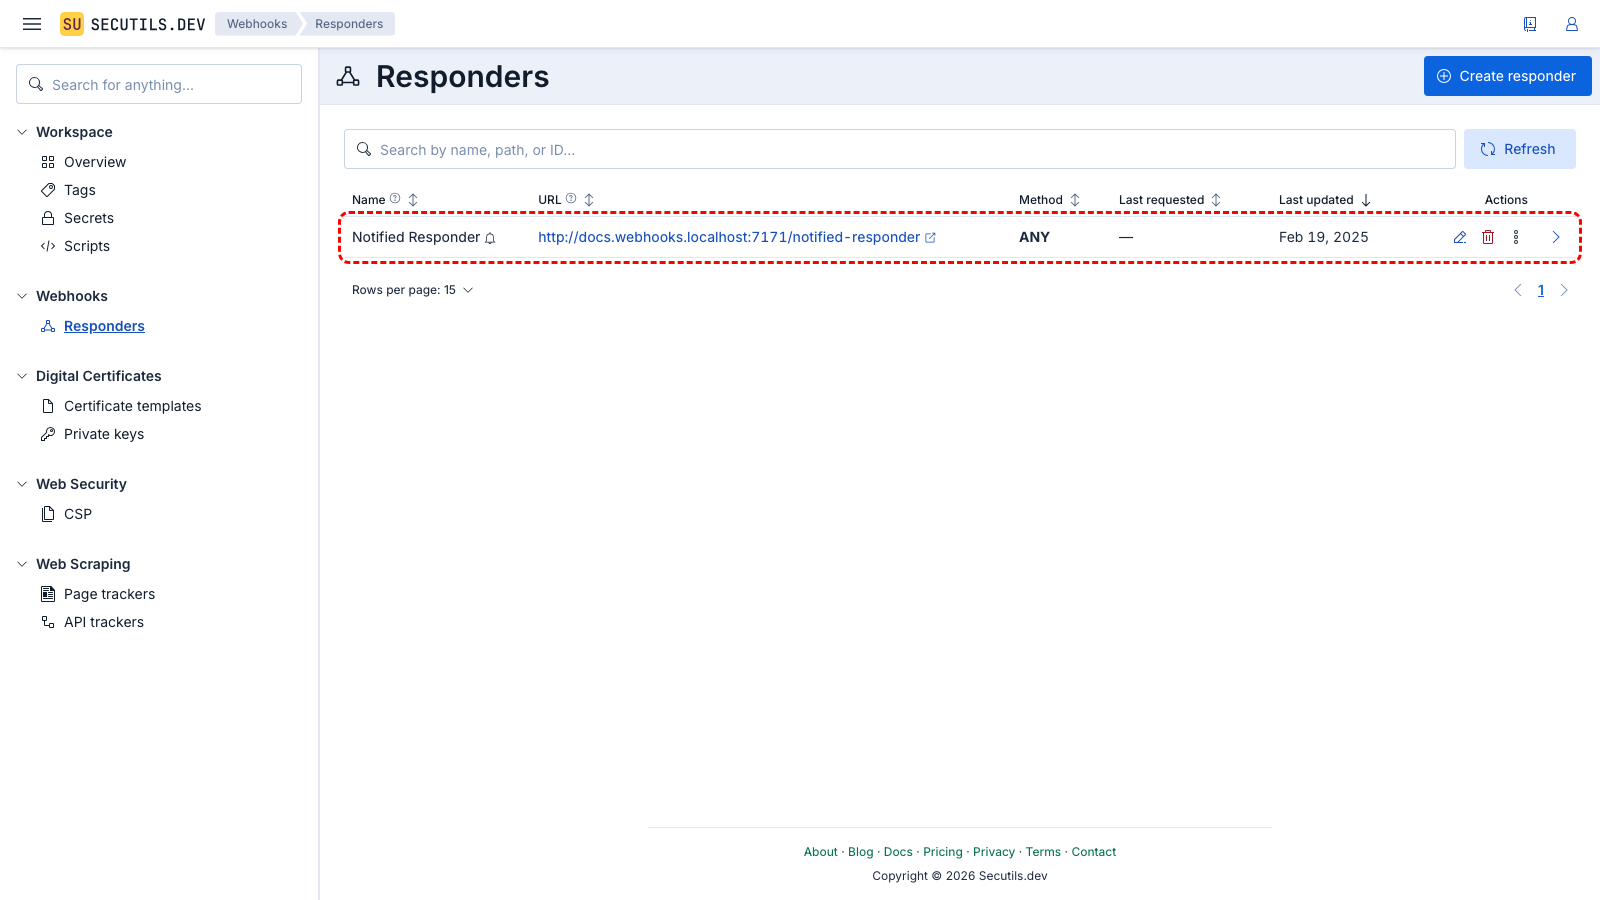
Get notified when a responder is hit
If you'd rather not poll the request history manually, you can ask Secutils.dev to email you when a responder receives requests. Because a responder is a public endpoint that can be hit at any rate, notifications are coalesced: instead of one email per request, you receive a single summary email per throttle window (for example, at most once every hour), telling you how many requests arrived since the last notification.
Notifications live under Advanced mode. They require request tracking to be enabled (Tracking, available in the standard settings, greater than zero), because the number of received requests is derived from the tracked request history - the toggle is hidden until tracking is enabled. Notifications are delivered to the email address associated with your account and carry an unsubscribe link, just like other Secutils.dev product notifications.
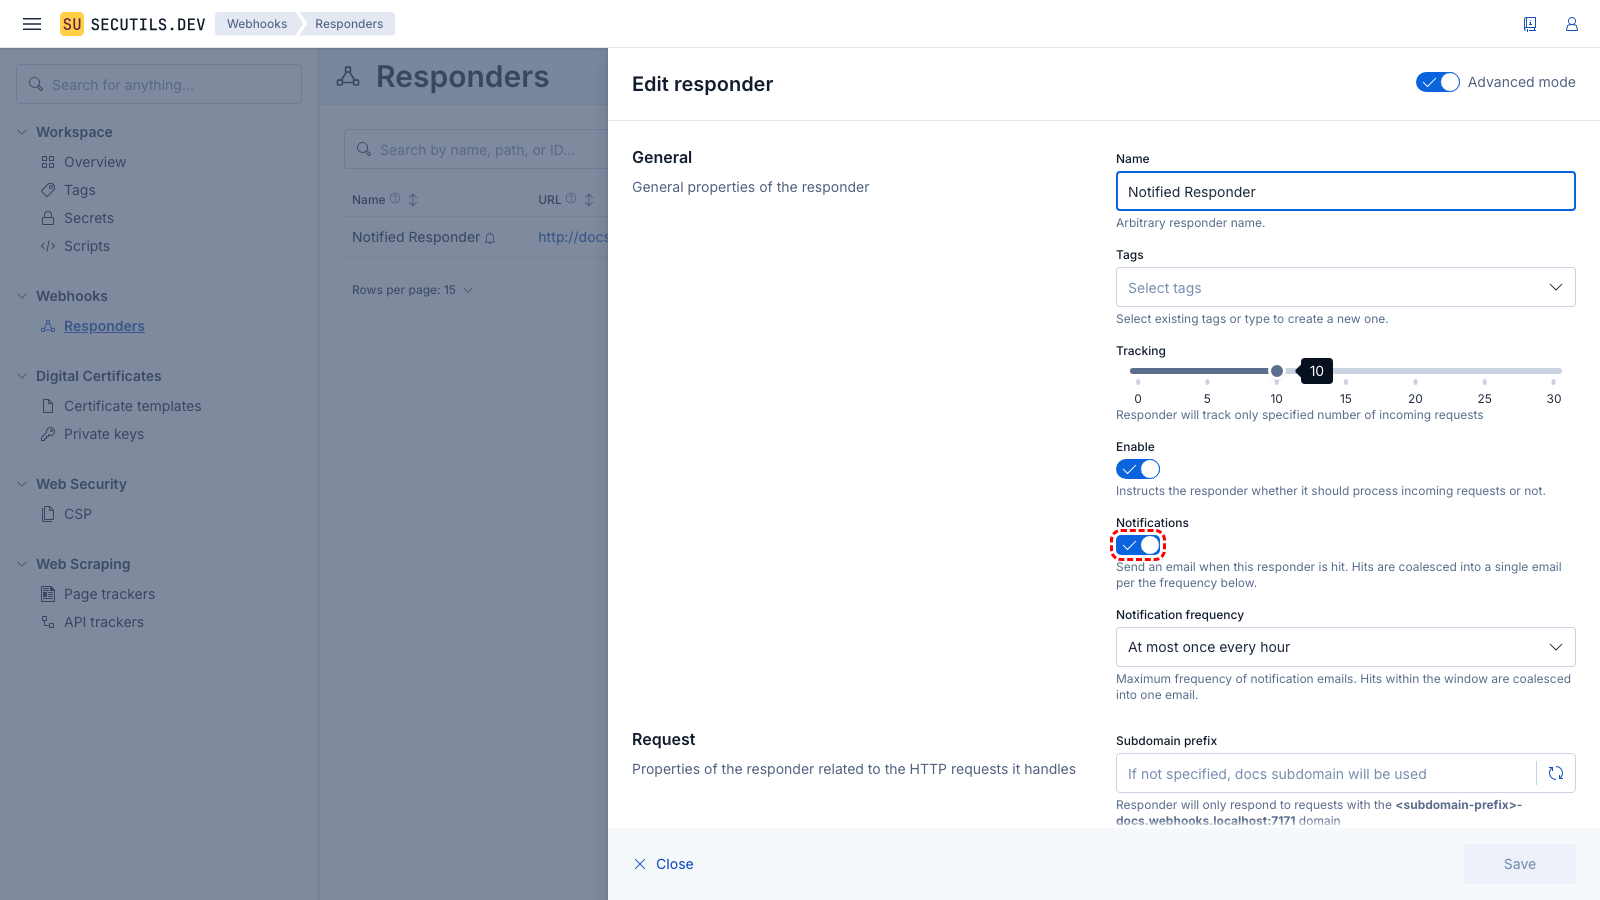
| Tracking | |
| Notifications | |
| Notification frequency | |
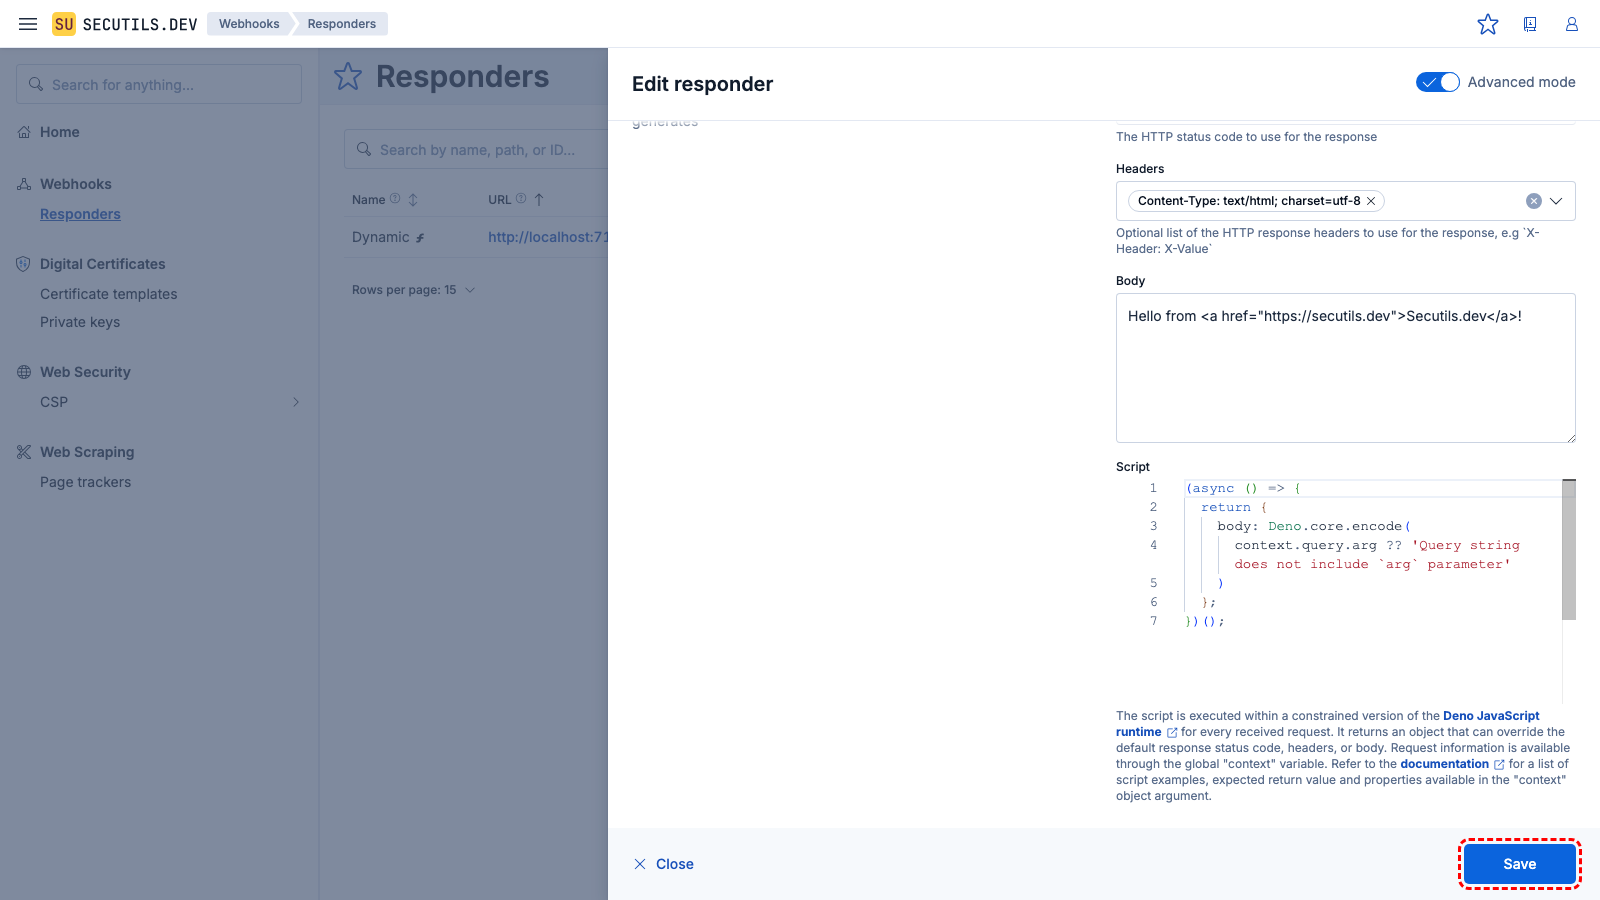
Generate a dynamic response
In this guide, you'll build a responder that uses a custom JavaScript script to generate a dynamic response based on the request's query string parameter:
The script should be provided in the form of an Immediately Invoked Function Expression (IIFE). It runs within a restricted version of the Deno JavaScript runtime for each incoming request, producing an object capable of modifying the default response's status code, headers, or body. Request details are accessible through the global context variable. Refer to the Annex: Responder script examples for a list of script examples, expected return value, and properties available in the global context variable. See Deno Sandbox Runtime for the full reference of available Deno.core APIs.

| Name | |
| Path | |
| Tracking | |
| Headers | |
| Script | |


arg query parameter the script returns the default message.
?arg=hello to the URL and reload. The script reads the query parameter and returns the dynamic reply.Annex: Responder script examples
In this section, you'll discover examples of responder scripts capable of constructing dynamic responses based on incoming request properties. Essentially, each script defines a JavaScript function running within a restricted version of the Deno JavaScript runtime. This function has access to incoming request properties through the global context variable. The returned value can override default responder's status code, headers, and body. For a complete reference of the Deno.core utilities available inside the sandbox (encoding, Base64, type checking, and more), see Deno Sandbox Runtime.
The context argument has the following interface:
interface Context {
  // An internet socket address of the client that made the request, if available.
  clientAddress?: string;
  // HTTP method of the received request.
  method: string;
  // HTTP headers of the received request.
  headers: Record<string, string>;
  // HTTP path of the received request.
  path: string;
  // Raw query string of the received request (without the leading `?`), if present.
  rawQuery?: string;
  // Parsed query string of the received request.
  query: Record<string, string>;
  // HTTP body of the received request in binary form.
  body: number[];
  // User secrets (decrypted key-value pairs). Manage secrets in Workspace → Secrets.
  secrets: Record<string, string>;
}
Incoming requests reach Secutils.dev through a reverse proxy (Nginx in self-hosted setups, Traefik in the hosted service), which injects synthetic headers used internally to reconstruct the original request - anything starting with x-forwarded- (e.g. x-forwarded-for, x-forwarded-host, x-forwarded-proto), plus x-real-ip and x-replaced-path. These remain visible in context.headers so scripts can use them when needed, but the request history table in the UI hides them by default in the Headers column and exposes them in a separate, hidden-by-default Proxy headers column. The Client address column already reflects the real client IP (resolved from x-real-ip / x-forwarded-for) - and context.clientAddress does the same.
By default, no secrets are exposed to a responder. To enable secrets, open the responder's advanced settings and set the Secrets → Access mode to All secrets or Selected secrets. Once enabled, you can reference secrets in scripts via context.secrets.KEY and in static body/headers via ${secrets.KEY} template syntax.
The returned value has the following interface:
interface ScriptResult {
  // HTTP status code to respond with. If not specified, the default status code of responder is used.
  statusCode?: number;
  // Optional HTTP headers of the response. If not specified, the default headers of responder are used.
  headers?: Record<string, string>;
  // Optional HTTP body of the response. If not specified, the default body of responder is used.
  // Accepts Uint8Array, string, object, or array - see Body auto-conversion.
  body?: Uint8Array | string | object;
  // When true, the request is not recorded in the responder's tracked request history.
  skipRequest?: boolean;
  // When true, the response sent to the client is also stored alongside the tracked request.
  trackResponse?: boolean;
}
The body field accepts multiple types: Uint8Array for raw bytes, a string (auto-encoded to UTF-8), a plain object or array (auto-serialized to JSON), or a number/boolean (auto-stringified). See Body auto-conversion for the full conversion table.
Override response properties
The script overrides the responder's response with a custom status code, headers, and body:
(async () => {
  return {
    statusCode: 201,
    headers: { "Content-Type": "application/json" },
    body: { a: 1, b: 2 },
  };
})();
Inspect request properties
This script inspects the incoming request properties and returns them as a JSON value:
(async () => {
  // Decode request body as JSON.
  const parsedJsonBody = context.body.length > 0
    ? JSON.parse(Deno.core.decode(new Uint8Array(context.body)))
    : {};

  // Override response with a custom HTML body.
  return {
    body: `
      <h2>Request headers</h2>
      <table>
        <tr><th>Header</th><th>Value</th></tr>
        ${Object.entries(context.headers).map(([key, value]) => `
        <tr>
          <td>${key}</td>
          <td>${value}</td>
        </tr>`
        ).join('')}
      </table>

      <h2>Request query</h2>
      <table>
        <tr><th>Key</th><th>Value</th></tr>
        ${Object.entries(context.query ?? {}).map(([key, value]) => `
        <tr>
          <td>${key}</td>
          <td>${value}</td>
        </tr>`
        ).join('')}
      </table>

      <h2>Request body</h2>
      <pre>${JSON.stringify(parsedJsonBody, null, 2)}</pre>
    `
  };
})();
Use secrets in a response
This script reads a user secret and includes it in the response. Secrets are managed in Workspace → Secrets and are available via context.secrets:
(async () => {
  const apiKey = context.secrets.THIRD_PARTY_API_KEY ?? 'not-set';
  return {
    headers: { 'Content-Type': 'application/json' },
    body: { apiKey }
  };
})();
Proxy requests to an upstream service (MITM)
Responder scripts can forward incoming requests to a real backend using Deno.core.ops.op_proxy_request(), inspect or modify the response, and return it to the client. This turns the responder into a man-in-the-middle (MITM) proxy - useful for debugging, testing, and API traffic inspection.
Pure proxy - forward every request as-is (with optional insecure for self-signed certs and timeout in milliseconds):
(async () => {
  return await Deno.core.ops.op_proxy_request({
    url: 'https://real-backend:9200' + context.path,
    method: context.method,
    headers: context.headers,
    body: context.body,
    insecure: true,  // accept self-signed certificates
    timeout: 5000,   // fail after 5 seconds
  });
})()
Transform the response - e.g., inject a field into JSON responses. Compressed responses (gzip, deflate, Brotli) are automatically decompressed, so JSON.parse works regardless of the upstream's Content-Encoding:
(async () => {
  const resp = await Deno.core.ops.op_proxy_request({
    url: `https://real-backend:9200${context.path}`,
    method: context.method,
    headers: context.headers,
    body: context.body,
  });

  if (resp.headers['content-type']?.includes('application/json')) {
    const body = JSON.parse(Deno.core.decode(new Uint8Array(resp.body)));
    body._proxied = true;
    return { statusCode: resp.statusCode, headers: resp.headers, body };
  }

  return resp;
})()
Conditional proxy - proxy only certain paths, mock the rest:
(async () => {
  if (context.path.startsWith('/_cluster')) {
    return await Deno.core.ops.op_proxy_request({
      url: `https://real-backend:9200${context.path}`,
      method: context.method,
      headers: context.headers,
      body: context.body,
    });
  }
  return { statusCode: 200, body: { mock: true } };
})()
See Deno.core.ops.op_proxy_request() for the full API reference including request/response interfaces, error handling, and security considerations.
Persist state across requests
Responder scripts are stateless by default - each request runs in a fresh isolate. To accumulate state (counters, deduplication markers, or a log of captured requests), use the per-responder key-value store exposed under secutils.kv (get / set / delete / list / watch). For responders that need to store data the server operator cannot read, secutils.crypto.seal() encrypts payloads to a recipient public key using a Web Crypto-compatible sealed box.
Protect a responder with HTTP Basic auth
Responder URLs are public by design - anyone who knows the URL can hit them. For HTML apps you self-host or for JSON APIs you want to lock down, the script can gate access behind a password using HTTP Basic Authentication: browsers show a native sign-in prompt automatically, and curl -u user:pass works for API clients.
Store the password as a Secutils secret named APP_PASSWORD (managed in Workspace → Secrets) and grant this responder access to it via Advanced settings → Secrets. By default any username is accepted and only the password is checked; flip REQUIRE_USERNAME to true (and create an APP_USER secret) to require both:
(() => {
  // === Configuration ===
  // Set REQUIRE_USERNAME to true to also require a username.
  // - false (default): any username is accepted; only APP_PASSWORD is checked.
  // - true: the snippet additionally reads the expected username from
  //   the secret APP_USER. Create it in Workspace → Secrets.
  const REQUIRE_USERNAME = false;

  const expectedPassword = context.secrets.APP_PASSWORD;
  const expectedUsername = REQUIRE_USERNAME ? context.secrets.APP_USER : null;

  if (!expectedPassword || (REQUIRE_USERNAME && !expectedUsername)) {
    return {
      statusCode: 500,
      headers: { 'Content-Type': 'text/plain; charset=utf-8' },
      body: REQUIRE_USERNAME
        ? 'Missing required secrets APP_USER and/or APP_PASSWORD. Create them in Workspace → Secrets and grant this responder access to them.'
        : 'Missing required secret APP_PASSWORD. Create it in Workspace → Secrets and grant this responder access to it.',
    };
  }

  // Constant-time string comparison.
  const ctEq = (a, b) => {
    if (a.length !== b.length) return false;
    let r = 0;
    for (let i = 0; i < a.length; i++) r |= a.charCodeAt(i) ^ b.charCodeAt(i);
    return r === 0;
  };

  // Pure-JS base64 decoder (no atob in the sandbox).
  const fromBase64 = (b64) => {
    const C = 'ABCDEFGHIJKLMNOPQRSTUVWXYZabcdefghijklmnopqrstuvwxyz0123456789+/';
    const s = b64.replace(/=+$/, '');
    const out = [];
    for (let i = 0; i < s.length; i += 4) {
      const a = C.indexOf(s[i]);
      const b = C.indexOf(s[i + 1]);
      const c = C.indexOf(s[i + 2]);
      const d = C.indexOf(s[i + 3]);
      out.push((a << 2) | (b >> 4));
      if (c >= 0) out.push(((b & 15) << 4) | (c >> 2));
      if (d >= 0) out.push(((c & 3) << 6) | d);
    }
    return Deno.core.decode(new Uint8Array(out));
  };

  const auth = context.headers['authorization'] || '';
  const match = /^Basic\s+(\S+)$/.exec(auth);
  if (match) {
    const decoded = fromBase64(match[1]);
    const colon = decoded.indexOf(':');
    const username = colon >= 0 ? decoded.slice(0, colon) : '';
    const password = colon >= 0 ? decoded.slice(colon + 1) : '';
    const passwordOk = ctEq(password, expectedPassword);
    const usernameOk = !REQUIRE_USERNAME || ctEq(username, expectedUsername);
    if (passwordOk && usernameOk) {
      // Authenticated — fall through to the responder's default response.
      return null;
    }
  }

  return {
    statusCode: 401,
    headers: {
      'WWW-Authenticate': 'Basic realm="Protected", charset="UTF-8"',
      'Content-Type': 'text/plain; charset=utf-8',
    },
    body: 'Authentication required',
  };
})();
The script returns null on a successful match, which leaves the responder's default status code, headers, and body untouched - so the rest of your responder configuration (HTML page, JSON template, etc.) just works behind the auth gate.
HTTP Basic credentials are remembered by the browser until the tab is closed (no programmatic logout). If you need a real logout button, use the cookie-session pattern in the next section instead.
Protect a responder with a login form (cookie session)
For HTML apps, a styled login form gives a better UX than the native browser dialog and supports an explicit logout. This script renders a self-contained sign-in page that uses the Borealis design tokens (the same palette as the Secutils.dev sign-in screen), sets a session cookie on success, and clears it on ?_logout=1.
Like the Basic auth example, it uses a single APP_PASSWORD secret by default - the password value (URL-encoded) doubles as the cookie value, so there is no separate session-token secret to manage. Flip REQUIRE_USERNAME to true (and create an APP_USER secret) if you also want a username field.
Because this script handles both the GET (form render) and the POST (login submission), the responder must accept both. Open the responder editor and set Method to ANY.
(() => {
  // === Configuration ===
  // Set REQUIRE_USERNAME to true to also show a Username field on the login form.
  // - false (default): only APP_PASSWORD is required.
  // - true: the snippet additionally reads the expected username from
  //   the secret APP_USER. Create it in Workspace → Secrets.
  const REQUIRE_USERNAME = false;

  const PASSWORD = context.secrets.APP_PASSWORD;
  const USERNAME = REQUIRE_USERNAME ? context.secrets.APP_USER : null;
  const COOKIE_NAME = 'sec_auth';
  const MAX_AGE_SEC = 86400; // 24 hours

  if (!PASSWORD || (REQUIRE_USERNAME && !USERNAME)) {
    return {
      statusCode: 500,
      headers: { 'Content-Type': 'text/plain; charset=utf-8' },
      body: REQUIRE_USERNAME
        ? 'Missing required secrets APP_USER and/or APP_PASSWORD. Create them in Workspace → Secrets and grant this responder access to them.'
        : 'Missing required secret APP_PASSWORD. Create it in Workspace → Secrets and grant this responder access to it.',
    };
  }

  const ctEq = (a, b) => {
    if (a.length !== b.length) return false;
    let r = 0;
    for (let i = 0; i < a.length; i++) r |= a.charCodeAt(i) ^ b.charCodeAt(i);
    return r === 0;
  };

  // Parse application/x-www-form-urlencoded body manually
  // (URLSearchParams may not exist in the sandbox).
  const parseForm = (raw) => {
    const out = {};
    for (const pair of raw.split('&')) {
      if (!pair) continue;
      const eq = pair.indexOf('=');
      const rk = eq < 0 ? pair : pair.slice(0, eq);
      const rv = eq < 0 ? '' : pair.slice(eq + 1);
      out[decodeURIComponent(rk.replace(/\+/g, ' '))] =
        decodeURIComponent(rv.replace(/\+/g, ' '));
    }
    return out;
  };

  const sessionCookie = `${COOKIE_NAME}=${encodeURIComponent(PASSWORD)}; HttpOnly; Secure; SameSite=Strict; Path=/; Max-Age=${MAX_AGE_SEC}`;
  const clearCookie = `${COOKIE_NAME}=; HttpOnly; Secure; SameSite=Strict; Path=/; Max-Age=0`;

  const usernameField = REQUIRE_USERNAME
    ? '<label for="user">Username</label>\n    <input type="text" name="username" id="user" autocomplete="username" autofocus required>'
    : '';
  const pwdAutofocus = REQUIRE_USERNAME ? '' : 'autofocus';

  const renderLogin = (errorHtml) => ({
    statusCode: 401,
    headers: { 'Content-Type': 'text/html; charset=utf-8', 'Cache-Control': 'no-store' },
    body: `<!doctype html>
<html lang="en">
<head>
<meta charset="utf-8">
<meta name="viewport" content="width=device-width, initial-scale=1">
<title>Sign in</title>
<link rel="preconnect" href="https://rsms.me/">
<link rel="stylesheet" href="https://rsms.me/inter/inter.css">
<style>
:root {
  color-scheme: light dark;
  --bg:#F6F9FC; --fg:#1D2A3E; --muted:#516381; --title:#111C2C;
  --card:#FFFFFF; --card-border:#E3E8F2; --border:#CAD3E2; --input-bg:#FFFFFF;
  --primary:#0B64DD; --primary-fg:#FFFFFF; --primary-hover:#0A59C7;
  --error:#A71627; --error-bg:#FFE8E5;
  --shadow:0 0 2px hsl(216.67 29.51% 23.92%/.16),
          0 3px 10px hsl(216.67 29.51% 23.92%/.1),
          0 6px 14px hsl(216.67 29.51% 23.92%/.06);
}
@media (prefers-color-scheme: dark) {
  :root {
    --bg:#07101F; --fg:#CAD3E2; --muted:#98A8C3; --title:#E3E8F2;
    --card:#0B1628; --card-border:#2B394F; --border:#485975; --input-bg:#0B1628;
    --primary:#61A2FF; --primary-fg:#07101F; --primary-hover:#84B8FF;
    --error:#F6726A; --error-bg:#351721;
    --shadow:0 3px 10px hsla(0,0%,0%,.52), 0 6px 14px hsla(0,0%,0%,.28);
  }
}
*,*::before,*::after { box-sizing: border-box; }
html,body { margin:0; height:100%; background:var(--bg); color:var(--fg);
  font-family:'Inter','-apple-system',BlinkMacSystemFont,'Segoe UI','Helvetica','Arial',sans-serif;
  font-size:14px; line-height:1.4286; }
main { min-height:100%; display:flex; align-items:center; justify-content:center; padding:24px; }
.card { width:320px; background:var(--card); border:1px solid var(--card-border);
  border-radius:6px; padding:24px; box-shadow:var(--shadow); }
h1 { margin:0 0 4px; font-size:20px; font-weight:600; line-height:1.7143rem; color:var(--title); }
.subtitle { margin:0 0 20px; color:var(--muted); font-size:14px; }
label { display:block; margin:14px 0 4px; font-size:12px; font-weight:600; color:var(--title); }
.card > label:first-of-type, form > label:first-of-type { margin-top:0; }
input { width:100%; height:40px; padding:0 12px; border:1px solid var(--border); border-radius:4px;
  background:var(--input-bg); color:var(--fg); font-family:inherit; font-size:14px; outline:none;
  transition:border-color .15s, box-shadow .15s; }
input:focus { border-color:var(--primary); box-shadow:0 0 0 1px var(--primary); }
button { margin-top:20px; width:100%; height:40px; padding:0 12px; background:var(--primary);
  color:var(--primary-fg); border:0; border-radius:4px; font-family:inherit; font-size:14px;
  font-weight:500; cursor:pointer; transition:background .15s; }
button:hover { background:var(--primary-hover); }
.error { margin:0 0 16px; padding:8px 12px; border-radius:4px;
  background:var(--error-bg); color:var(--error); font-size:13px; }
</style>
</head>
<body>
<main>
  <form class="card" method="POST" action="?_auth=1">
    <h1>Sign in</h1>
    <p class="subtitle">Enter the password to access this page.</p>
    ${errorHtml}
    ${usernameField}
    <label for="pwd">Password</label>
    <input type="password" name="password" id="pwd" autocomplete="current-password" ${pwdAutofocus} required>
    <button type="submit">Sign in</button>
  </form>
</main>
</body>
</html>`,
  });

  // Logout: ?_logout=1 clears the cookie and shows the login form again.
  if (context.query._logout === '1') {
    return {
      statusCode: 303,
      headers: {
        'Set-Cookie': clearCookie,
        'Location': context.path,
        'Content-Type': 'text/plain; charset=utf-8',
      },
      body: 'Signed out',
    };
  }

  // Login form submission.
  if (context.method === 'POST' && context.query._auth === '1') {
    const form = parseForm(Deno.core.decode(new Uint8Array(context.body)));
    const submittedPassword = form.password || '';
    const submittedUsername = form.username || '';
    const passwordOk = ctEq(submittedPassword, PASSWORD);
    const usernameOk = !REQUIRE_USERNAME || ctEq(submittedUsername, USERNAME);
    if (passwordOk && usernameOk) {
      return {
        statusCode: 303,
        headers: {
          'Set-Cookie': sessionCookie,
          'Location': context.path,
          'Content-Type': 'text/plain; charset=utf-8',
        },
        body: 'Authenticated',
      };
    }
    return renderLogin('<p class="error">Incorrect ' + (REQUIRE_USERNAME ? 'username or password' : 'password') + '.</p>');
  }

  // Existing session cookie?
  const cookieHeader = context.headers['cookie'] || '';
  const matched = cookieHeader
    .split(';')
    .map((s) => s.trim())
    .find((c) => c.startsWith(COOKIE_NAME + '='));
  if (matched) {
    const value = decodeURIComponent(matched.slice(COOKIE_NAME.length + 1));
    if (ctEq(value, PASSWORD)) {
      // Authenticated — fall through to the responder's default response.
      return null;
    }
  }

  return renderLogin('');
})();
Drop a "Sign out" link anywhere in your app HTML pointing at ?_logout=1 to give users an explicit logout. The cookie is set with HttpOnly, Secure, SameSite=Strict, and a 24-hour Max-Age - tweak MAX_AGE_SEC if you want a shorter or longer session window. Because the cookie is path-scoped to /, a single sign-in covers every protected responder on the same subdomain.
This pattern is intended for a single shared password (one app, one team). It does not support per-user accounts, password rotation without invalidating all sessions, or rate-limiting brute-force attempts. For higher-stakes content, consider client-side encryption or a dedicated identity provider.
Selectively track requests
By default every incoming request is recorded in the responder's tracked history (up to the configured limit). If you only care about certain requests, the script can return skipRequest: true to suppress tracking for the current request while still returning a normal response:
(async () => {
  // Only track non-health-check requests.
  const skip = context.path === '/healthz' || context.path === '/readyz';
  return { body: 'ok', skipRequest: skip };
})();
Track responses
By default, only the incoming request is stored in the history. If you also need to inspect the response sent back to the client (for example, to debug upstream proxy results), the script can return trackResponse: true. The response status code, headers, and body are then stored alongside the request in the same history row:
(async () => {
  const resp = await Deno.core.ops.op_proxy_request({
    url: `https://backend.example.com${context.path}`,
    method: context.method,
    headers: context.headers,
    body: context.body,
  });
  return {
    ...resp,
    // Only track the response when the upstream returned an error.
    trackResponse: resp.statusCode >= 400,
  };
})()
The tracked response body is subject to a size limit (default 1 MB). If the response exceeds this limit, the stored copy is truncated, but the full response is still sent to the client.
When a script fails (throws an error, times out, etc.), the error response is automatically captured in the tracked request without needing trackResponse. This provides crucial debugging visibility for script failures.
If both skipRequest: true and trackResponse: true are set, skipRequest takes precedence and no tracking occurs at all.
Export request history as HAR
The request history table includes an Export as HAR button that downloads the tracked requests (and responses, when available) as an HTTP Archive (HAR) file. HAR files can be imported into browser DevTools, Charles Proxy, or other HTTP analysis tools for further inspection.
The duration column shows the total server-side processing time for each request, and this value is included in the HAR file's timing information.
Generate images and other binary content
Responders can return not only JSON, HTML, or plain text, but also binary data, such as images. This script demonstrates how you can generate a simple PNG image on the fly. PNG generation requires quite a bit of code, so for brevity, this guide assumes that you have already downloaded and edit the png-generator.js script from the Secutils.dev Sandbox repository (you can find the full source code here). The part you might want to edit is located at the bottom of the script:
(() => {
  // …[Skipping definition of the `PngImage` class for brevity]…

  // Generate a custom 100x100 PNG image with a white background and red rectangle in the center.
  const png = new PngImage(100, 100, 10, {
    r: 255,
    g: 255,
    b: 255,
    a: 1
  });

  const color = png.createRGBColor({
    r: 255,
    g: 0,
    b: 0,
    a: 1
  });

  png.drawRect(25, 25, 75, 75, color);

  return {
    body: png.getBuffer()
  };
})();